Translate

Saturday, September 3, 2011

More Fitting and Aligning

All right, I wasn't done.  Rivets, rivet holes, thinning fiberglass and general workmanship issues drove me back to the headlight buckets.  I marked the areas that needed attention...


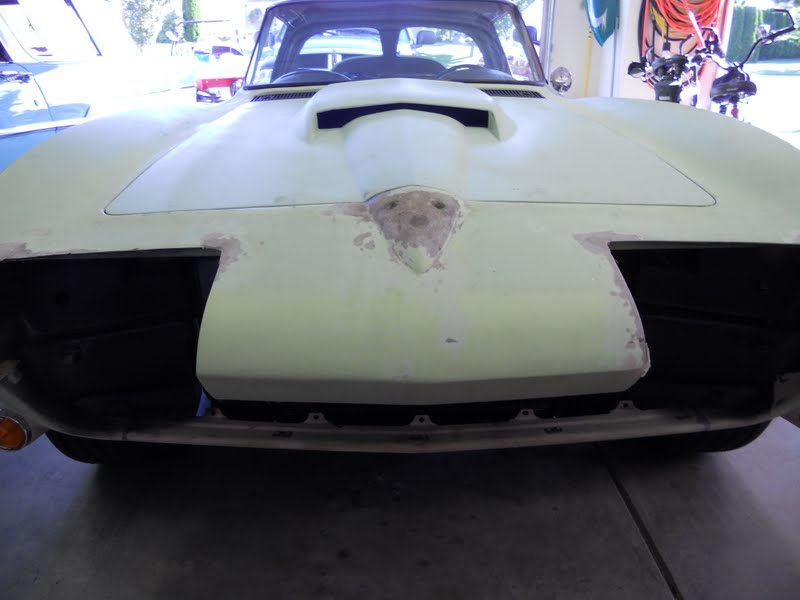
then ground all the areas until the fiberglass was almost paper thin.


Those areas were then filled with fiberglass resin and matting.


After grinding the fiberglass, a thin coat of Bondo was applied...


then the front end was painted with 2 part epoxy primer.


Although I don't have pictures to support his effort, Ty spent several hours fitting the rear bumper area to perfection.


After all that hard work we loaded up the Corvette and took it to a local Friday night car show a few miles down the road.  It was a fun evening and several people stopped to talk about our project.


Oh yeah.  I got tired of people referring to my trailer as a POS so I made some minor modifications and gave it a fresh coat of paint.  I think it turned out great and I doubt Ty and Dennis will bad mouth it any more.


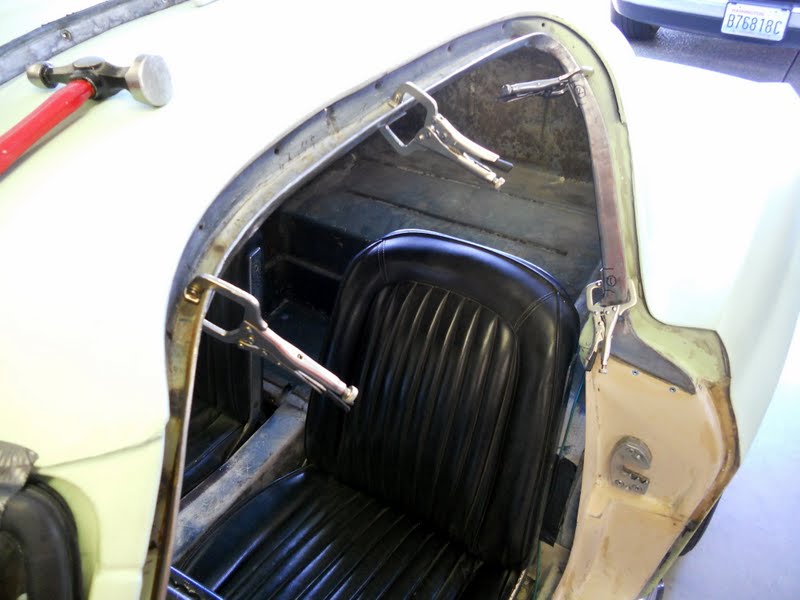
OK, so here's where we are.  There is one more repair that needs to be worked on before we can say "fit" is complete.  There is an interference between the right side A pillar and the passenger door that won't allow a chrome piece to be installed.  This interference can only be corrected by cutting and repositioning the A pillar.  Once this is repaired we can remove the body and start doing "finish" work.  Be forewarned, finish work will be a long process.

While the body is removed we will fix several items on the rolling chassis.  If you double click on the picture you'll see some of the things we need to do.

Check back in a couple weeks to see if the A pillar has been repaired.  Thanks for watching.

Sunday, August 21, 2011

Fitting and Aligning Headlight Buckets

Fitting and aligning headlight buckets.  Sounds simple.  Sounds innocent.  Yeah, right...
First you start off with what appears to be a perfectly fine 1963 Corvette front end.


Then you look real hard for any kind of stress fractures that might later show up in the paint job.  You grind back a little paint and you grind back a little fiberglass then you sandwich the area with fresh fiberglass to make it real strong.


Then you keep looking real hard until everything looks suspect then you grind it all back and re-fiberglass everything.


After the fiberglass sets up you clean everything up by grinding and feathering some more.


Headlight bucket inner plate reinforcements are next.  These bolt to the header bar that run left to right just behind the headlights.  After these are bolted in and the support rods are installed its time to apply bonding adhesive.


As we did for the hood, I used a set of dumbbells to match the height of the body and the buckets.  Bonding adhesive was then applied between the body and the header bar and allowed to cure.


I used a bent length of flat bar to get the proper contour as shown.


20 hours later it looks pretty good.  All it needs now is a little primer to pretty it up.


Then you do the exact same thing to the other side.  I am not sure I am done but they're much better.


What the ???  Is that Wilson?


Naw...  It's Ty.  He's working on the interface between the bumper and body.  This too will require grinding, fiberglass and feathering.  More on this in a later edition.

As always, thanks for watching.

Friday, August 5, 2011

Hood Alignment

Ty and I aligned the hood until we had a nice gap along both fenders and the front of the car.  Shims were installed as necessary then all 10 hinge bolts were torqued down tight.

When we rebuilt the front end a year ago the body was off the chassis.  Now that the body is on the chassis, the headlight brackets are installed and the hood is aligned, we can see there are issues. 


The front corners of the hood and the front center of the hood are properly shimmed with the body but the nose sags in between those areas.  Ty and I agreed the mismatch in height was unacceptable and we also agreed the cure would not be Bondo.


It sags between each of the headlight buckets.


We decided to remove the front end support structure in its entirety and start over.  This took hours of work and it was not for the squeamish.


If you double click on this picture you'll see hammers, chisels, a sledge hammer, an air chisel and a variety of other tools of persuasion.  More importantly, the nose support and the headlight bucket supports have been removed.


After grinding away the old bonding adhesive from all the supports and the underbody we started reassembly.  Because bonding adhesive sets up so quickly it was decided to bond the nose support in sections starting with the center.  In this picture the clamps hold the the nose support in position while the center section is being bonded.  The dumbbell is holding the center section flush with the hood.


Bonding adhesive is a catalyst compound that basically glues fiberglass pieces together.  Unlike Bondo, it can not be used as a filler.  Because the hood support is now bonded at the center, access to the rest of the support is limited.  In cases like this I've found that disposable cake decorating bags work great as an applicator.  In this picture the bonding adhesive is mixed, loaded in the bag and ready to be piped into place.  All I have to do is snip the bag and squeeze.  I get about 10 minutes working time before the adhesive starts to set up.  


Once again I use dumbbells to maintain alignment with the hood.  They work great.


I think the results are exceptional.  Compare this picture with the first and judge for yourself.

If you haven't guessed, headlight buckets are next.

Thanks for watching.

Saturday, July 30, 2011

Rivet Nuts

Shop time remains limited and will stay that way until October or November.  For those of you that insist I post something every couple weeks or so I offer this nugget of information about a pretty cool tool.

Have you ever tried to tighten a molding, sill plate, chrome trim piece or something similar only to find that the hole for the screw had stripped out?  Options were to either use a bigger screw, goop up the existing hole with something and hope the screw holds, or just push the screw into the hole and hope it stayed there.  Now there's another option and it's called a rivet nut.  Below is a Rivet Nut kit that I bought at Tacoma Screw.  There are other manufactures as well.


It's a pretty simple process.  The stripped hole is drilled out to a size that accommodates the rivet nut you want to use.


5 different sizes came in my kit.  This rivet nut is steel but other materials are also available.


The rivet nut is screwed onto the tool then inserted into the drilled hole.  The tool is squeezed until the backside of the rivet nut mushrooms.  Unlike a pop rivet gun, nothing pops or breaks though. 


The rivet nut ends up flush on the outside...


and it mushrooms on the backside.  Here is an example of one I used on a flat washer. 


This thing works so well I decided to use rivet nuts for the whole upper door molding on the drivers side door.


10 minutes later I had the molding installed and it's very secure.  I'll do the other side as well.

I am sure I'll be using rivet nuts at several locations, especially when we start the interior trim pieces.

As always, thanks for watching.

Saturday, July 23, 2011

Drivers Side Door Alignment - 1963 Corvette

As was the case for the passenger door, the drivers side upper hinge had to be ground and the lower hinge had to be shimmed.  Once we were satisfied with the alignment all 20 hinge bolts were torqued down. 

Now it's time to work on the door to body fitment.  Instead of using Bondo my preference is to build up low areas using fiberglass.  I removed the primer from all the areas that were either mismatched or too low.  Duct tape was placed to channel excess fiberglass resin away from the rest of the car.  


Duct tape works great because fiberglass resin won't stick to it. 


Door gaps were stuffed with strips of foam rubber to prevent resin from going inside the door jamb. 


Fiberglass was then applied and allowed to cure.

Some areas actually bridged the door gap.


The duct tape was removed after the fiberglass cured.


The fiberglass was cut at all the door gaps using our Fein Multimaster tool.  Door gaps were then sanded open to the proper width using a small piece of sheet metal wrapped with sandpaper.


The 2 inch square fiberglass patch in this picture was done over a year ago when we reinstalled the B-pillar.  I ground this area paper thin then used it as a form for the fiberglass we applied today.  Remember, the fiberglass we use is clear which means the patch you see is on the backside.


With today's effort we will only have to use a small amount of Bondo when we prep for paint. 


That's it!  Both doors are done.

Sunday, July 10, 2011

C2 Corvette Drip Rail Clips

Back in 2009 when our Corvette was delivered Ty made me promise not to throw anything away during the restoration.  I thought that was an odd request but I've since seen the wisdom.

These are the original upper door drip rails that we replaced over a year ago.  They're nasty, rusty, difficult to store and they have sharp edges.  It would have been easy to toss them but I kept them and I am glad I did.  They have original trim clips and they tell us where the trim clips get installed.  You won't find that information in any book.  In this picture I have already drilled out the spot welds and removed one clip.


The drip rail requires 5 clips but ours only had 3 usable ones.  2 had to be fabricated.  Can you pick out the replica in this picture?  I can't either.

4 of the 5 clips are ready for welding.


Each was plug welded then ground smooth.


All 5 are now installed on the drivers side. The passenger side is next. 


Thanks for watching.

Monday, July 4, 2011

More Odds and Ends

My time in the garage is still limited but Lester (Wilson) says that's no reason for not posting.  So here's a few odds and ends that I hope will satisfy one of my most faithful followers.  You can also check out Peter's blog on his 1966 Corvette restoration.  Peter is another faithful follower that lives in Spain and his blog is at http://elcorvettedepeter.blogspot.com/

Ty and I continue to align the drivers side door.  As was the case on the passenger door, we had to grind away some of the thickness on the upper hinge.  The lower hinge will need 4 shim plates.  We didn't have any so Ty made 3 with available material but we need more.  I have since ordered several.


With 3 shim plates installed on the lower hinge you can see that the upper part of the door doesn't fit quite tight enough.  The extra shim plate should do the trick. 


Overall the door looks really good.  It shouldn't need much glass work at all.


Switching topics, the brass fuel float in the fuel injection unit had a leak and had been filling up with gasoline.  When the float doesn't float the car doesn't run.  This float has two halves that are soldered together.  After a couple failed attempts to repair the old soldered joint I removed all the old solder and resoldered with new.  The FI unit is back together and it's much better now.


Changing topics again, mechanical fuel injection experts recommend calibrating and tuning our engine using an air/fuel meter.  Sounds good to me.  Here I just finished welding the bung for an O2 sensor onto the drivers side side pipe.  Don't worry, this is the reproduction side pipe, not the original one.


The meter was installed in our make shift dash and it works great.  The optimum reading would be 14.6, that's 14.6 pounds of air to 1 pound of fuel.  The reading you see is a little rich but it was taken at idle.  We hit 14.6 when the car is cruising down the road.  Our Corvette currently has 108 octane racing fuel in it but it will soon be changed to pump gas.  When that happens we will retune the engine using our new gauge.

That's it for now.  I will not be able to work on the car for the next couple weeks so, Wilson, you're just going to have to grin and bare it.  Keep checking back though!