Translate

Friday, February 24, 2012

"The List"

I've been working-off the punch-list.  Only a couple items remain and I am OK postponing those two for awhile (click on the picture for a better view).  That means we're getting close to putting the body back on the rolling chassis.  Before we do, there are a few items worth talking about.


The oil pan and oil filter were removed for inspection.  I didn't find any parts, pieces or metal shavings in the bottom of the pan and that's good.  I did find what looks like sludge though.  We have a fresh built motor and fresh oil so the sludge makes no sense.  I decided the only thing it can be is the zinc additive ZDDP.  ZDDP is recommended for older engines to help lubricate the solid lifters and the cam.  If you think the sludge is something else let me know.


Dennis K put me on to this neat product.  It's a one piece pan gasket made by Fel-Pro.  The pan gasket on a small block Chevy is usually four pieces that require silicone at all the joints.  This gasket is installed dry, has inserts in all the bolt holes to prevent over torquing, and it should solve the oil leak we have near the bell housing.


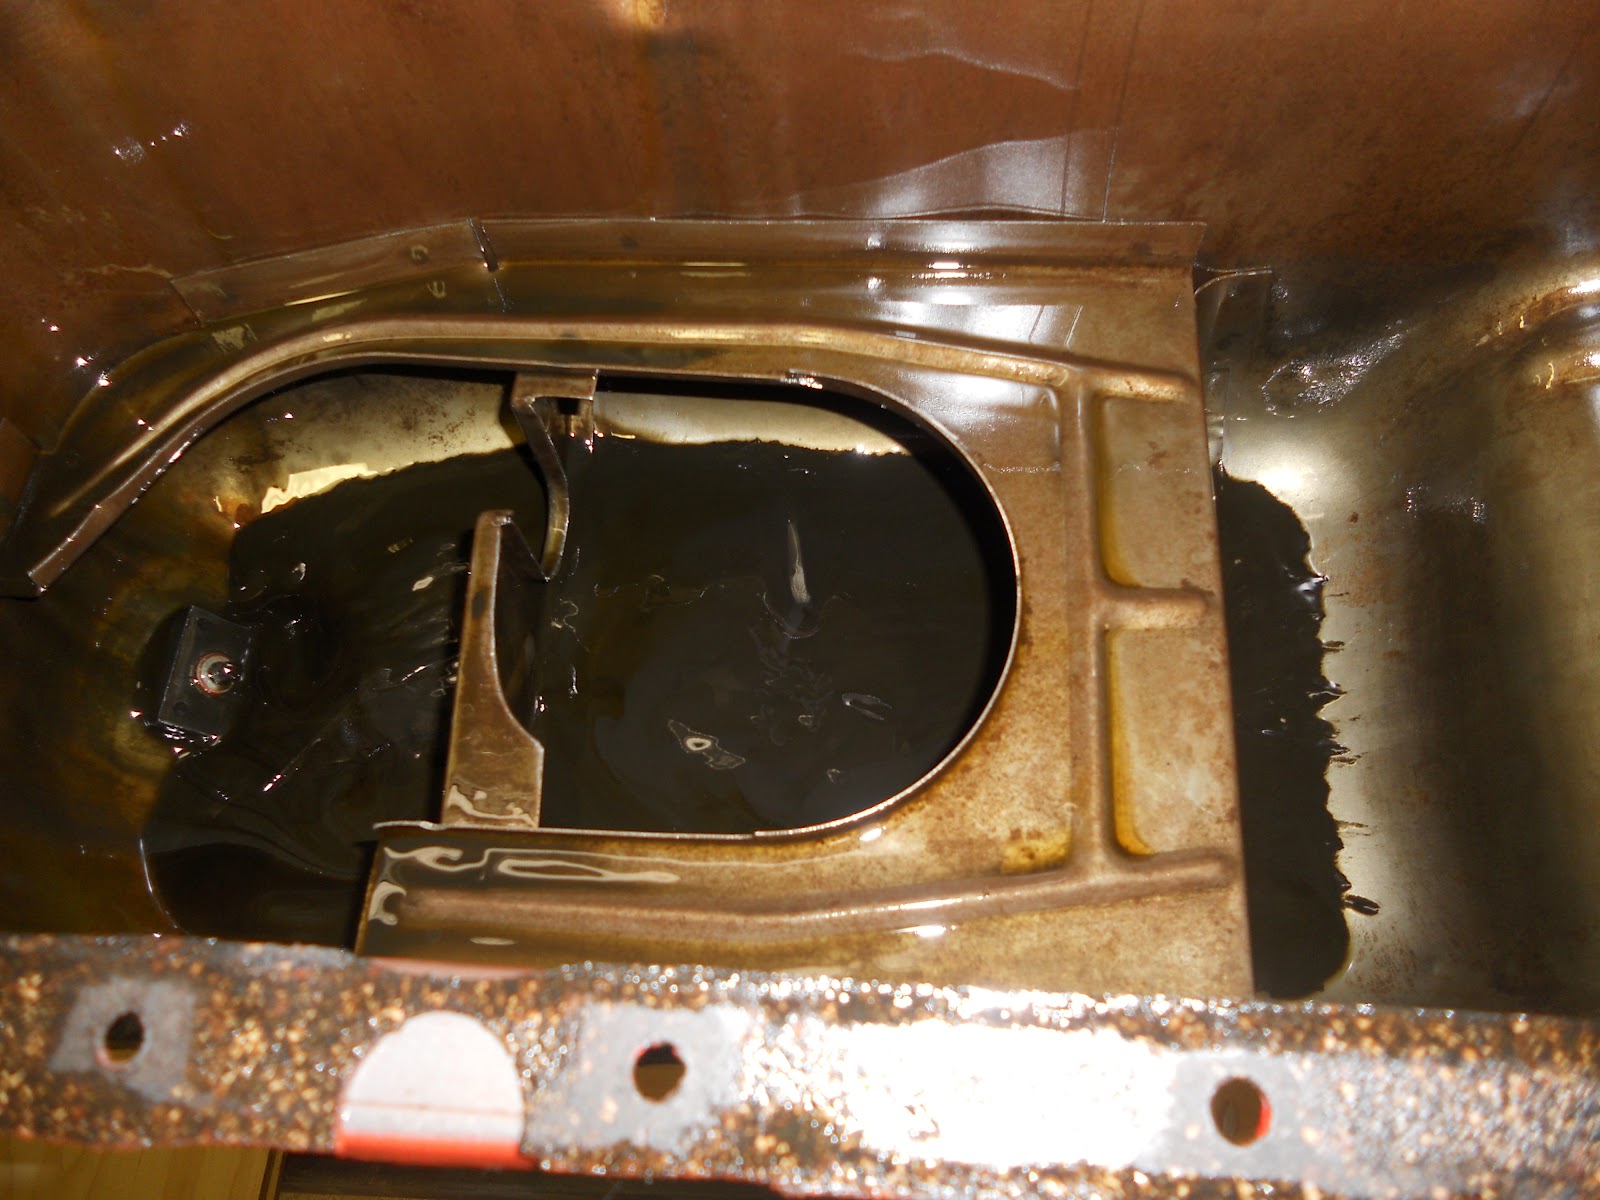
It's hard to see, but the black area in the middle of the photograph is the underside of the birdcage.  This area will never be seen by anyone because the frame rail covers it up.  None the less, both sides were painted with Eastwood's Rust Encapsulator, a very durable chassis paint.  It was tough to get at but it's done.


Remember this?  It's the last rusted area we fixed on the bird cage.  The metal was repaired but we never fixed the fiberglass floor.


To make the repair the duct-tape in the middle was used as a form.  Fiberglass goes over the top of this duct tape.  The ring of duct-tape along the bottom is used as a dam to collect excess resin.  Between the two the fiberglass repair should be fine.


To understand this picture you have to remember that our resin is clear.  Click on the picture and you'll see the duct-tape form is on the backside of the fiberglass repair.


Here it is a day later.  Now all I have to do is remove the duct tape.  Fiberglass does not stick to duct tape so the job should be simple.


It worked great.  A little grinding here and there and the floor will be ready for Dynamat.


And finally, look what we have.  Grey spoke American Racing Torque Thrust D's made in the USA.  These are more "period correct" than the chrome wheels we currently have on the Corvette.  I will put these grey wheels on the Corvette, then put the chrome wheels on our newly acquired Nomad, then sell those old Cragars that are currently on the Nomad.  It's time the Cragars go and this is my method.


We have lost a very important part of this build.  It's unfortunate and I am bummed about it.  That will be the subject of our next post.

Saturday, February 18, 2012

Keeping it Real

It's nice to see the rolling chassis again.  Before we covered it up a few months ago we had a list of things we needed to fix, repair and replace.  Lets get started.


Last year we drove our Corvette a total of maybe 15 miles.  During that time we noticed the rear end made a clunking noise, especially on turns.  Clunking can occur when the differential sits for several years and the internals dry out.  The fix can be as simple as doing a series of figure 8's with the car.  Unfortunately, that fix didn't correct our problem.  Since the rear end still had a clunk and because it wasn't date coded for 1963, we decided to replace it.  In this picture Ty is just starting the removal.


An hour or so later the troubled rear end had been removed.  It would have been a nightmare to do this had the body been installed.  Ty made it look simple but we know better.


The gray unit is the one that was removed.  The black one is its replacement and it was purchased on EBay about 6 months ago.  It's date coded early 1963, which ours is, and it has 4-11 gears.  In 1963 the vast majority of all fuelies came with 4-11 gears so it's perfect for our car.


Dennis K stopped by and helped Ty with the installation.  There was a lot of moaning, groaning and cursing needed to install the differential.  When it was all done we rolled the car around and verified the clunking noise was gone.  Excellent!


1963 Corvettes did not use bearing caps, they used U-bolts like the one I am holding.  Since I don't have a full set they will have to be ordered.  I'll install them as soon as I get them.


Dewayne J also stopped by.  We had an oil leak somewhere between the engine and the bell housing so Dewayne removed the tranny and bell housing for inspection.  There wasn't any oil behind the flywheel so we think the leak is coming from the rear of the oil pan.  We'll fix that shortly.


While the transmission was out we swapped clutch forks.  1963 clutch forks were unique because they used a ball and socket push rod.  The one that's installed now is correct for 1963.  All other years are like the one I am holding.


In early 1963 Corvettes used a Borg Warner T10 4-speed transmission.  That's what we have and it's correct for our car.  Later in 1963 the transmissions were changed to Muncie.  One of the issues with the early T10's was they often popped out of 2nd gear.  Ours does the same.  There are a few things that could cause this, a worn shift fork is one possibility.  A new set of these forks are on order and they are easily installed via the transmissions side cover.  If that doesn't fix the problem then this tranny will have to be removed and rebuilt.  Our fingers are crossed for the shift forks.


The steering on our car was a little sloppy so we decided to remove and rebuild the steering box.  When we disassembled the box it had thick grease inside, it should have had 90 weight gear oil.  Turns out over the years the exhaust pipe is so close to the steering box that it can cook the oil turning it to grease.  We soaked everything in carburetor cleaner for a couple hours then replaced all the bearings and seals and filled it with a high quality 90 weight synthetic gear oil.

It's interesting to note that the carburetor cleaner removed all the black paint but was unable to remove the green House of Kolor primer.  That's the same primer we have on our car.  It's tough stuff!


The steering box was reinstalled and it's as smooth as silk. It should operate just like it did when new.  Note the location of the exhaust pipe.


We will continue to work-off our punch-list items.  The body will be reinstalled soon so it's important to make these fixes now while access is good.

Thanks for watching.

Sunday, February 12, 2012

Second Guide Coat

We're finally down to fixing little things.  The car has about a dozen of these blemishes.  I decided to fix them with glazing compound followed by a second guide coat.


They are tiny but they have to be fixed during the primer stage.  Once we apply color no further repairs will be possible.


This is the drivers side front fender.  The color saturation of this photo has been modified so you can better see the difference between these three repairs.  As you know this fender had fire damage several years ago and because of that this fender gets extra attention.  When I saw this fender had blemishes I decided to grind into the fiberglass to make sure we didn't have bigger problems.  The repair in the middle had good fiberglass but the other two had issues.  You can see the difference in texture and color of the shavings.  White is right.


Both bad areas were ground until good fiberglass was exposed.  The bad spots were each about the size and thickness of a silver dollar.  All three areas were masked off then fresh fiberglass and resin was applied.


The fiberglass was ground smooth then a thin coat of Bondo was applied.


The Bondo was sanded smooth then glazing compound was applied.


All three areas were block sanded until smooth to the touch.  They turned out very nice.


As stated earlier, all the other blemishes only needed a little glazing compound.


After the blemishes were fixed the whole car received a second guide coat.


Then the block sanding began (again).  So far everything looks and feels good and there are only a few spots where we sanded through the primer.  The body is really looking nice.


Block sanding is about half done now but it's very tedious and boring work.


So I think we need to do something different.  How about some knuckle crunching, finger smashing, knee scrapping, back breaking work on the rolling chassis?  I think that would be fun.  And I think I'll get some of my good friends to participate.  How about Ty T, Dewayne J, and Dennis K?

Stay tuned!

Saturday, February 4, 2012

Paint - Primer - Second Coat

Check out that masking!  I am getting better.


This is a cool product.  It's folded plastic rolled on a stick with masking tape running along one edge.  You position the tape then unfold the plastic. 


The car received it's official second coat of primer.  Once again the paint booth worked great.


Everything is looking pretty good if I do say so.


Beautiful body lines.  You'd never know those wheel wells had been cut out.


Everything looks good to my eye.


Ty, I think your dad would be proud of our work.


It's a beautiful thing...


 It looks really good and I am very pleased.

But we're not finished.  We get to do it all again.  Guide coat, glazing, then we sand the whole car again.  Our objective is to finish the next guide coat process with a lot less exposed fiberglass.

Wish us luck!