Translate

Showing posts sorted by relevance for query windshield clips. Sort by date Show all posts

Sunday, December 2, 2012

Windshield and Trim Installation - 1963 - Mid-Year - C2

There is very little information on the Internet about how to install a 1963 Corvette windshield.  As such, I'll be a little more detailed with my methods and techniques, be them right or wrong.

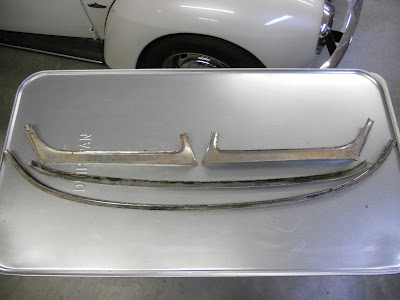
The 63 Corvette windshield trim is unique as it is only 4 pieces.  Our trim will be sanded with 800 grit sandpaper, hand rubbed with steel wool followed by a firm buffing wheel then a soft wheel. 


The back side of our trim is dirty and caked with old weather stripping.  This side will be cleaned with Goof-Off only.


The 1963 Corvette windshield requires 18 thin clips and 6 thick clips.  The clips are for the top and bottom molding only, not the sides.  Be advised that after market clips are notorious for not working very well.  


As such, I decided to do a dry fit of the trim and trim clips.  I masked the paint to prevent scratches and used small pieces of tape to mark clip locations.  During this process I discovered that the trim clips I had ordered from Zip Corvette were not engaging, they were horrible.  Corvette discussion groups on the Internet told me Paragon makes a better clip so I ordered a set.  They worked OK but I suspect OEM is best.  You just can't find them though.  Trim clips are pricey at about $4 each.


The windshield was weatherproofed with 3M Bedding and Glazing Compound, part # 08509.   The backside of the clips get this compound before installation.  If you don't do this the windshield will leak. 


All the clips are installed in this photo.  The 6 wide clips are located on the lower trim piece, three on each end.  The windshield frame is extra thick in these locations and require special clips.


Bedding compound is then applied around the full perimeter of the windshield frame.


The windshield gasket is installed around the windshield then a nylon cord is inserted in the slot that accepts the car body.  This goes all the way around the windshield.  The windshield is then set on the windshield opening then the cord is slowly pulled from the inside of the car allowing the gasket to lap over the windshield frame.  Gerri and I did it in the first try but I understand others are not typically as fortunate.  The windshield fell into place when the last couple inches of cord were pulled.  


It looks great. 


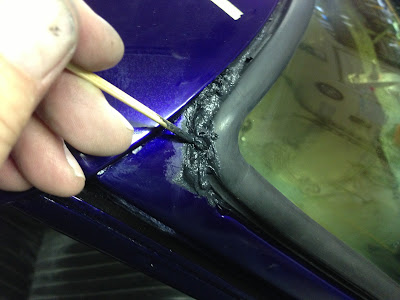
The upper corners needed a little extra compound so I force fed them with extra compound and a stick.


I smoothed the corners over with a rag dampened with Goof-Off.


Now it's time to seal the gasket to the windshield.  For this I filled a cake frosting bag with bedding compound then used the back side of a plastic spoon to lift the gasket.  After this was completed I used Goof-Off to remove the excess compound.  It worked very well with no damage to the paint.


Unlike the rear windows, the windshield trim pieces are installed separately.  First the upper and lower pieces are snapped into position then the side pieces are slid into position and screwed down.


I am very pleased with the results and it went a lot better than I had expected.  Patience is key.


I am not sure what's next.  Whatever it is, the wiring harness won't be too far away.

Thanks for watching.

Sunday, November 25, 2012

Bumpers, Brackets and Bolts

The two front bumper brackets on the left are for something other than a 1963 Corvette.  If you look close you'll also see that they are identical, both for one side.   Fortunately, I was able to pick up an OEM set, the ones on the right.  I believe these were used only in 63 and 64 and the early 63 brackets were extra thick.  But that's what we have, early brackets and an early Corvette.


After sand blasting and painting the brackets I dismantled the front end then installed the brackets.  The  trouble light is hanging off of one.


The bottom of the front grill section gets an aluminum molding cover, 3 pieces fastened with clips and rivets.   Instead of using rivets  I decided to use rivet nuts instead.  You can check out this cool tool here:   http://1963splitwindow.blogspot.com/search/label/Rivet%20Nuts . The arrow points to 1 of 8 installed.  I am missing the center aluminum section so I'll have to wait to install.  It's due in later this week.


Next are the rear bumpers and exhaust valance.  I jacked the car up using my nifty Race Ramps.


Here are all the brackets needed for the rear bumpers.  Instructions come from the Assembly Manual.


Bumpers are on and looking good.  Duntov's design was intended to mirror the tail lights. 


I installed the valance using stainless steel button hex head bolts.  It's not factory correct but I like it.
All the hardware for the bumpers and brackets are Grade 8.  Unfortunately, the body is sandwiched between the brackets and the bumpers and I am sure even a moderate bump would cause extensive fiberglass damage.  The bumpers are not there to protect the body, I think they're there to destroy it. 


Looking sexy!


I even buffed and clear coated the aluminum license plate frame.


Next will be the windshield and the windshield trim.

Thanks for watching.

Sunday, April 21, 2013

Dash, Headlights and Wiring

I accomplished a lot of things this week.  It started with the installation of a new speaker.


I re-painted the speaker grill with Por-15 Chassis Coat Black.  It's satin and turned out very nice.


The clock was re-installed using 2 special clips.  They hold the clock and insure proper grounding.


I purchased a new glove box (upper left).  All the metal components were media blasted and painted with Por15.  The glove box door is unique to 1963 and ours is original but it's condition is horrible.  It can't be saved, at least not by me.  I'll be watching for a better one.  


Our 1963 door has missing pieces, holes drilled at the top, cracks and scratches everywhere.


I installed the glove box and frame then remembered...


I have a 64 (or later) door that didn't sell at the Portland Swap Meet.  I reconditioned it with Por15 and installed it temporarily.  It's not a 63, it has a couple dents, but it will do for now.


Not too bad.


I installed the windshield washer spray heads and used Rivet Nuts to fasten the wiper grills.


I coupled the Flaming River steering column to the steering box with a beautiful polished stainless steel universal joint.  The spline counts will vary by year.  Mine is a 3/4" 36  X 3/4" 36.  It took me too tries to get it right.


Here is a better picture of the blinker and tilt levers I modified to make look like  original.


The headlight wiring harness was finally installed.  I had to remove the grill and bumpers for access.    In this picture you can see the running lights are now working. 


 Viewed from below are the two headlight bucket motors.  They are installed and wired.


Also installed are the two horns.  GM horns in the 60's were identical between most models.  The difference is the bracket and orientation of the horn.  An original set of working horns for a 1963 fuelie would set you back about $1500, but you can't find them.  Mine are from a Skylark.  The horns sound like a 63 Corvette, they're orientated properly, but the mounts are slightly different.  I am good with it.


I also installed the headlights.  Here they are tucked up under the nose.


Here they are in the open position.  Ty had spent a lot of time refurbishing these so they were simple to install.  They still get bezels but they're not yet painted.


So, after all of this work, do you know what time it is?  Check out these videos.


Friday, March 22, 2013

Heater Delete & Wiper Motor

 The block-off plate for the heater motor is the last piece on our car that has rust issues.  There are also several drilled holes that are not original.  The one rusted hole in the upper right.


The Heater Delete block-off plate is rare.  I hesitate to make repairs as I am concerned that I may loose distinguishing marks that show authenticity.  The gasket number is a good example.


Welding was kept to short intermitent durations to prevent warping and to prevent the gasket from melting.  The rusted area in the corner was drilled out just large enough to get to sound metal.


Using a scribe, I marked a plug out of same gauge metal.


Using a copper backing bar, I made a series of alternating tack welds to minimize heat.


This is as much restoration as I am willing to do.  The block-off plate gets tucked up behind the passenger fender in the engine compartment against the fire wall.  It will be hard to see.  


A couple coats of flat black paint makes it look acceptable.


The original gasket survived and it will work as intended.


It's there.  Right in the middle of the picture.


The windshield wiper motor...what can I say.  After restoring the wrong one I searched E-bay for a replacement.  I bought this original, properly coded, fully restored motor.  All finishes are correct and the restoration included the washer pump assembly. 


Look close and you'll see 3 different plug-in locations.  The lone one is for the ground.


New rubber mounting hardware was included.


Clips, fasteners, plastic and rubber parts are all new.


As viewed from inside the car, installation was a easy with the dash removed.


It looks good and it tucked up nicely behind the distributor.


The wiper transmission is a simple design.  I put it in the blast box and freshened it up with crushed walnut.  Hoppies lubricant was used on all moving parts and it's now good as new.


This is the wiper transmission in the neutral configuration, or off position.  To insure proper wiper motion the left wiper lever must be positioned up and the right wiper lever positioned down.


The wipers work great and they look awesome.


More interior work is next.  Check back often for updates!