Sunday, October 28, 2012

Refurbishing Corvette Window Trim

Lester recently asked about how I was refurbishing the trim pieces.  As you can see, my trim pieces are discolored, dull and rusty.  Fortunately, the trim is stainless steel, not chrome.  It will clean up nicely.


I picked a corner piece as a representative sample.  It is painted, pitted, rusty, dull and scratched.


Because of the pitted areas I had to start with 800 grit sandpaper.  I dry sanded this piece until all of the blemishes were gone.  This piece still has a very minor pit but I am not going to be concerned.


Next I use 1000 grit sandpaper to remove the scratches left by the 800 grit paper.


That was followed by a hard cloth buffing wheel with coarse rouge.  Rouge is like a stick of hard plastic.  You briefly hold it against the spinning wheel then polish the item.  Coarse grit rouge is black and I only had to use it for a couple minutes.


Here's our piece just after I used the black rouge.  The piece is a little dull but the scratches are gone.


I finish with a soft cloth wheel on the buffer and green rouge.  Green is for stainless steel. 


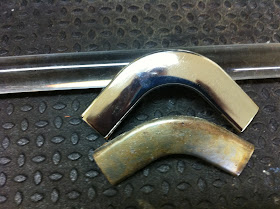
Here's a side by side comparison.  I cleaned the under side with a rag and Goof-Off, a great all purpose solvent/cleaner.  Now all I have to do is spend a couple hours doing the rest of the pieces.   


The windows are installed and so are all the trim pieces.  The trim isn't flawless but it is shiny and looks great to me.  I am very pleased with the results.  Double lick on the following pictures and check it out.


Lester, thanks for the great question.

Next will be the side exhaust.

Friday, October 19, 2012

Rear Window Installation - Dos and Don'ts

This has been an interesting couple of weeks.  I did a lot of research on installing the rear windows, the problem is I started the installation before I fully understood the process.  Follow along as I make a couple mistakes but finally get it right.

First order of business was to locate all the trim clips exactly where they were originally.  Ty and I took precision measurements before the clips were removed but it was easier to just look inside the cab.  These clips have teeth and they leave marks.  The clips were easy to locate.  


The rear windows had been laying around the shop for the last 3 years and they were grungy to say the least.  I used my dual head/dual action Cyclo polisher with a mild abrasive to clean them up.  They turned out nice, but they still show their age.  If you recall this window had sticky letters, Not for Hire.


With Gerri's help I was able to seat the window.  It fit perfect.  I was very pleased.  It was shortly after this picture I realized I had to remove everything.  I found out the window was going to leak and the trim was not going to snap into place.  Let me explain.


Turns out the rubber gasket needs to be sealed and the trim clips need to be placed where the trim tabs are located.  In the picture below I've removed the glass and rubber gasket.  All the trim pieces have been hooked together.  I am dry fitting to make sure the trim clips are aligned with the tabs on the trim.


  Note how the clip on the bottom isn't located under this trim tab.  The clip has to be moved right a good inch.   This clip had no chance of holding the trim.  This clip and 6 others needed adjusting.


I put duct tape on all the trim joints to hold the assembly together.  The trim needs to be installed as a unit.  If you snap it in one piece at a time you're most likely going to bend something.  Original replacement trim for a 63 Corvette coupe is very very expensive.  Check E-bay and be amazed.


Now it's time to lay down a bead of 3M Bedding and Glazing Compound.  A 1/4" bead is all you need.  This will seal the rubber gasket to the body.  Tape is laid down because I know this can get messy.


The gasket was installed on the glass then a length of wire cord was installed in the grove that the body fits into.  While applying pressure from the outside, Gerri pulled the wire allowing the rubber lip to slide over the lip of the body.  It worked great.


The glass and gasket fell right into place.


Check out the glazing compound.  It sealed perfect and didn't leave a big mess.


Glazing compound is also needed between the rubber gasket and glass.  For this I put the compound in a disposable cake frosting piping bag.  You've seen it, the bag filled with frosting that's used to decorate cakes.  I used a plastic spoon to lift the rubber then piped the compound back into the joint.  It was a little messy but not bad.  You can see the extra compound oozing out in places.


The trim was snapped into position then I cleaned up everything.  It looks wonderful!  

I'll start working on the other window next.

Thanks for watching.

Sunday, October 7, 2012

A Little Bling

Sorry guys, I've been under the weather and have not been able to work on the car much.  I was able to load up the Corvette and take it to the car wash for a very deserving bath.  It was filthy from all the sanding and buffing.  The good thing is the paint job stood up to the high temperature high pressure wash.   Here it is just after its bath.


Ty introduced me to these when we were at Corvettes of Carlisle.  They are high density styrofoam blocks covered in something like Rhino liner.  They are light weight and they lift the car 12".


While on my creeper I can scoot anywhere under the car.  This will be helpful when I install the side exhaust, spare tire tub, front grill, parking brake, headlights, tail lights, wiring harness, etc.


I decided it was time to give our Corvette a little bling.  I started with the front emblem.


The side badging really looks good.


Just above the right rear tail light is this badge. 


I also installed the weather-stripping at the top of the doors.


Front blinkers were next.


Then the rear view mirror. 


I used my new Baldor buffer to clean up the "cookie sheets".  They're original and look very nice.


The gas cap emblem looks awesome on top of the racing stripe.


I was even able to install the door handles.  These also cleaned up nice on the Baldor.


I installed all the tail lights too.


Earlier today I sent Ty a video of a walk around of the car.  I thought you'd like to see it too.

Either the rear windows or the Dynamat should be next.

Thanks for watching.