Translate

Wednesday, November 30, 2011

Hood Repairs

Only a few days left to vote on the hood and racing stripe.  Vote in the upper right corner.

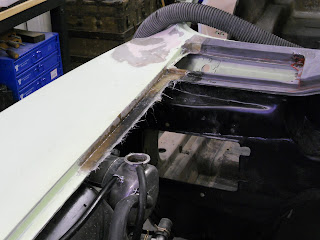
While replacing the fresh air cowling I spotted a questionable section of fiberglass on the passenger side front fender hood lip.  I ground out the area until it was paper thin.

Fresh fiberglass and resin were laid in and allowed to cure.

A little feathering brought it back to new.

The area is super strong and I am glad I repaired it.  Better safe than sorry.

Our 1963 hood was purchased last year locally and it had been involved in a head on collision.  When that happens to a C2 Corvette the front end of the car usually jambs the hood to the point that it can not be opened.  Common practice is to use a reciprocating saw to remove the front end.  Unfortunately, the hood often gets cut in the process and that's what happened to this hood.  The hood has two cuts and this delamination.


The delamination was dressed up then bonding agent was applied.


While the clamps held the delamination the cut was feathered back then fiberglassed.

Both of the cuts to the hood were repaired.

Although the car is looking uglier by the day, it's getting better by the day.  After we remove the old paint from the hood we will shoot everything with fresh primer.

Before long we will start installing Dynamat on the interior.  This insulating and heat barrier needs a clean surface to adhere properly so I got out the Dewalt side grinder and a big wire brush. 

The results are pretty impressive.  This will take some time but I got a good start on it today.

Expect more on the hood, door jambs and drip rails.  After that... Fresh Primer!

Tuesday, November 22, 2011

Fresh Air Cowling

I just noticed we have had 40,000 views on this blog.  Excellent.

We recently test fit the 1963 hood and noticed that the body lines on the fresh air cowling were not crisp and didn't match the hood very well.  If you've been following this blog you'll recall that this cowl received extensive repairs a couple years ago. Check out that repair here:
http://1963splitwindow.blogspot.com/2009/06/more-fiberglass-repairs.html 
We decided to replace the existing (green) cowling with an original undamaged cowling (the red one).


Using our Fien vibrating tool and a chisel we were able to remove the old cowling with little difficulty.


The bonding strips were cleaned and fiberglass repairs were made where needed.  The brown paper was used to keep resin off of the fire wall.


After the fiberglass set it was ground and feathered until the original contour was restored.


The new cowling was clamped into position then bonding agent was applied and allowed to set.


Check it out.  Nice sharp body lines and we got rid of the excessively repaired cowling.


Very little Bondo will be required at the joints.


Ty has been doing a lot of work on the 1963 hood.  Those pictures will be posted soon so keep watching.


Shop Talk Tidbit

OK, here's the deal.  We know we want a racing stripe but the style may have to be dictated by the year of the hood that we use (see photo's below).  We have both hoods.  The thought had been to use a stripe that would accommodate both hoods, however, a long time follower of this blog, Jim Q., thought that using a hybrid stripe that accommodates both hoods might look peculiar.  He may be right.

So the question is, do we want the 63 hood and stripe, the 67 hood and stripe or a hybrid stripe that will allow both hoods to be interchanged?  Tell us what you think.  Vote in the poll located in the upper right corner of this post!

In this picture the hood and stripe are classic 1963.


In this picture the hood and stripe are classic 1967 big block.