Translate

Friday, October 29, 2010

327 - HOME RUN! Our 1963 327 FI Corvette Engine Sounds Awesome!

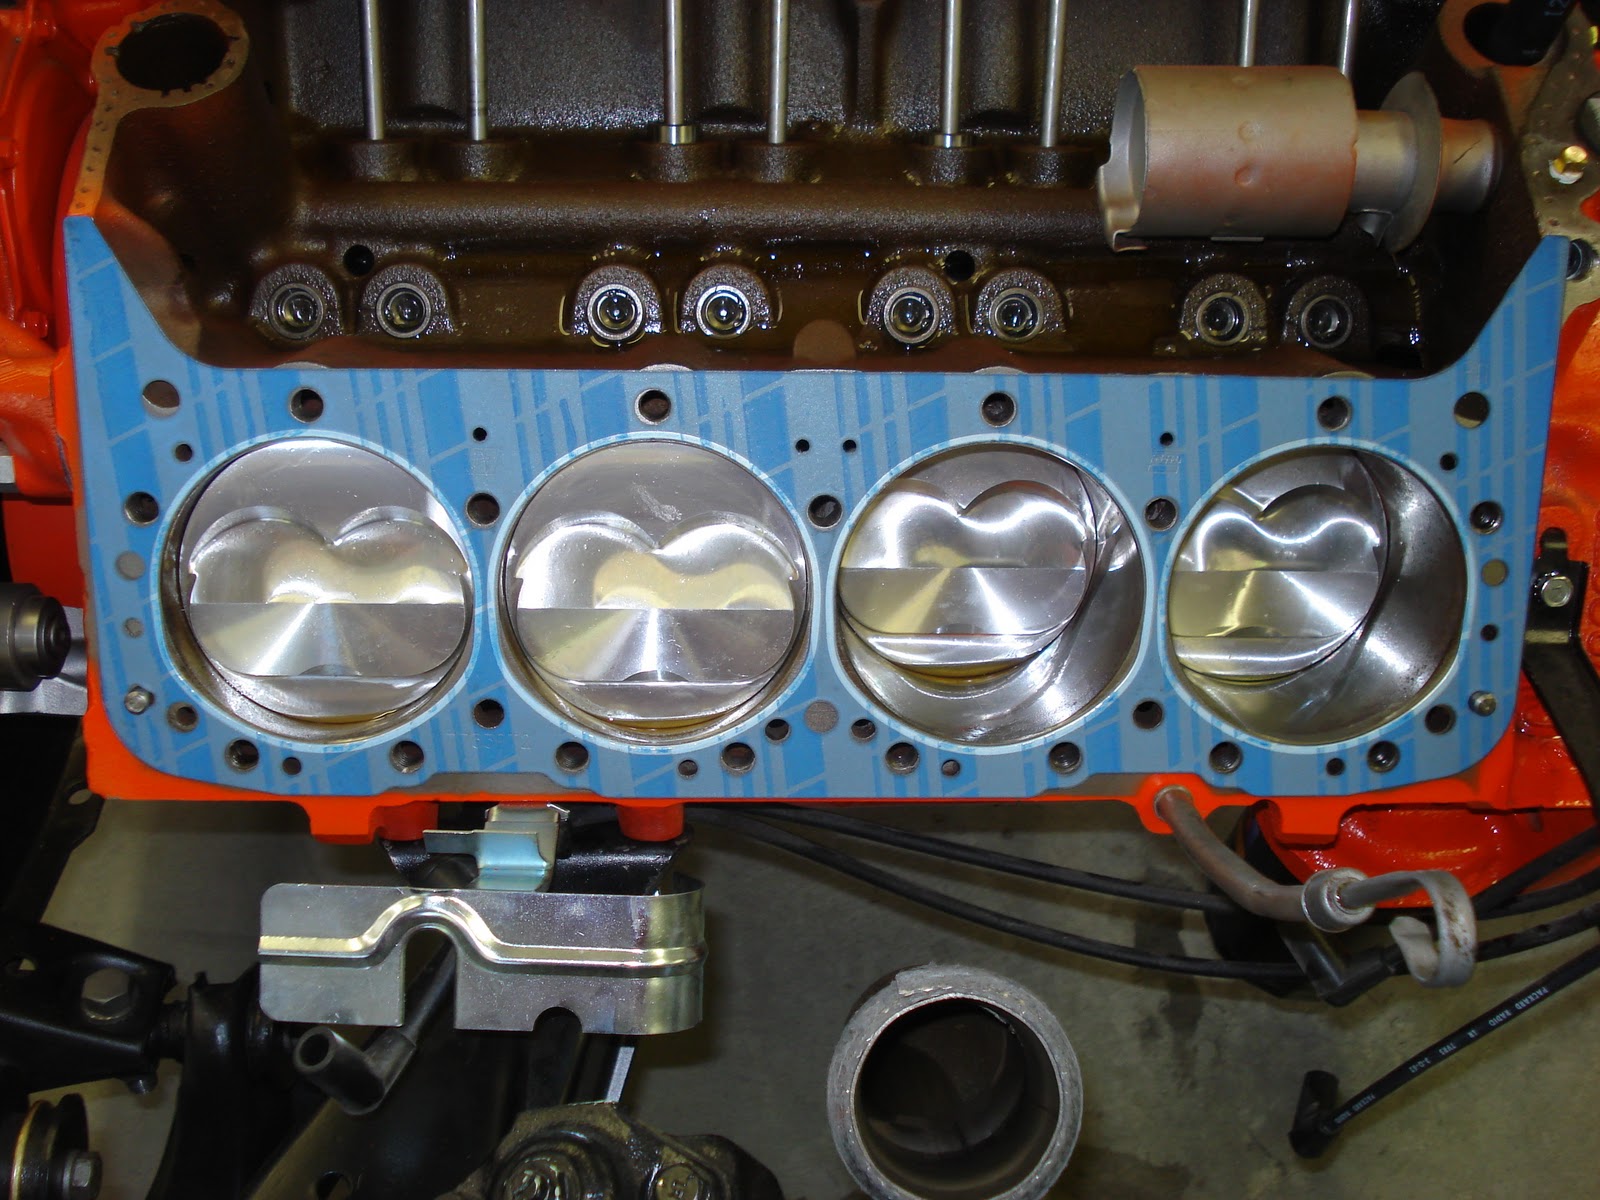
After weeks of frustration we finally got our 1963 327 fuel injected engine to run on its own.  We are extremely excited and we love the way it sounds.  It's awesome!

ORIGINAL FOOTAGE OF THE FIRST SUCCESSFUL START


ADDITIONAL FOOTAGE

Note:  I wasn't able to download the audio file mentioned in the second video.  This blog does not accept that audio file type.

MYSTERY SOLVED - IT WAS THE HIGH PRESSURE FUEL PUMP

I spoke with Gary Hodges yesterday.  Gary is one of just a few people that really know how these mechanical fuel injection units work.  Gary has been dealing with these units for the last 40 years.  Gary sells FI parts and his web page is  http://www.garyhodgesramjet.com/2001.html


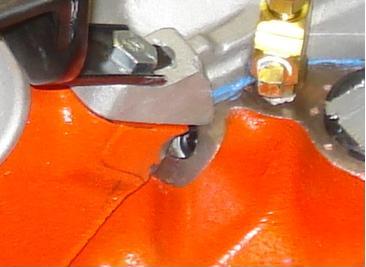
I discussed the high pressure fuel pump with Gary and he recommended that I scribe all three main housing pieces before I take the pump apart.  Ty is scribing the fuel pump in this photo. 

Double click on this picture to see the scribe lines.  It's important.

Now, take note of the tiny hole on the end cap near the center of the pump.

This tiny hole is located on the high pressure side of the pump and it shouldn't be there.  When the pump is running the fuel escapes through this hole and goes back into the fuel bowl, not to the injectors.  The end cap had been installed 180 degrees out of position.


This is the correct orientation.  The vent hole is now on the atmosphere side of the pump.  We verified this by examining a picture of an original fuel pump found on Jerry Bramlett's web page.  Check it out here http://www.jerrybramlett.net/museum.html


Note the missing scribe line on the cap.

It's on the opposite side now.  The pump is now assembled properly.

Time to reassemble.

Everything lined up perfectly.

We hooked up the spider and gave the pump a test.  OMG!  We could have drowned in all that fuel!

We were running the drill motor on the lowest speed possible.  Fuel was gushing out like never seen before.  Whoo hoo!


So, what happened next?  Why we grabbed our spouses and celebrated with a little bubbly of course!  Check it out:

Thanks for watching.

Thursday, October 28, 2010

Cleaning Up the Wheel Wells

All of our wheel wells have vintage undercoating.  This would be old hard and dried undercoating.  I removed large patches with an air chisel but it didn't remove years of dirt and road grim.   I dug out several air tools and I tried all of these discs. 

They worked well but they couldn't get into the nooks and crannies.


This area would have been impossible to clean with a die grinder.

So I decided to sandblast.  It's messy, it's dirty, but I knew it would work.

I like using Quikrete Commercial Grade Medium Sand because the granules are small enough to get through the nozzle yet large enough to do a good job of removing rust and paint.  Play sand doesn't work in my blaster, it plugs up the nozzle.


The results are pretty spectacular.  In fact, this wheel well  is ready to paint.


But this is only 1 wheel well and it took 100 lbs. of sand.  Three more of these are waiting plus the transmission tunnel.
 

Ty, you're missing out on all the fun!

Sunday, October 24, 2010

Manometer

Today I built a manometer to find out if our motor creates enough vacuum to operate the spill plunger.  A manometer measures pressure or vacuum and is measured in inches of either mercury or water.  It's a simple device and I build one using the basic instructions shown at  http://www.bullittarchive.com/7031.htm


To operate the manometer the PVC pipe was filled with colored water...


Then the ruler was positioned at the top of the water column.

 The tubing was attached to the rear of the fuel injection plenum.
 Then, with the coil disconnected, I cranked the motor over and it developed about  3.5" of vacuum.  This is with the PCV valve installed.
 I removed the PCV valve, plugged the hole then cranked the motor again.  This time we got about 4.0" of vacuum.  The PCV valve only took .5" of vacuum.  Not bad.

So what does this mean?

One of my favorite sites for fuel injection information is Ramjets that Run at  http://www.jerrybramlett.net/index.html.  Jerry Bramlett talks about cold start cranking vacuum and states, "Only .5" to .7" water vacuum is needed at the main diaphragm during cranking to generate a good fuel stream at all nozzles."

So, in conclusion, since we only need .5" to .7" water vacuum and we have 3.5", I guess we need to look elsewhere for our cold starting problem.  Next we will investigate the high pressure fuel pump at low RPM.  Stay tuned. 

Saturday, October 23, 2010

327 - Looking for Vacuum Leaks

Our fuelie has trouble starting and a vacuum leak is the likely cause.  I removed the cover of the fuel injection unit to take a look. 


This is the connection that draws air from the fuel bowl.  If you stand in front of the engine it would be located on the left side of the plenum.  Although the rubber hose and fittings are an 1/8" or so in diameter, there is only a tiny hole that draws air.  You can see the hole on the inside of the plenum just under the fitting.  No issues here.


This is the fitting for the PCV valve and it's located on the left side of the plenum near the rear.  We have a PCV installed but it might not be the correct one.  The 63 and 64 fuelies had unique PCV's so this might be part of the problem.  It's worth looking into.


This is the vacuum line that feeds the cold start enrichment valve and it's located on the front left corner of the plenum.  This one we want to draw air.


This is the throttle body valve and it's located on the right side of the plenum.  It's 99% closed during the cranking procedure.  I don't see any issues here.


This is a threaded outlet used for power brakes.  Since our Corvette doesn't have power brakes this outlet only gets a plug.  I don't see any issues here either.


I removed and cleaned the plenum lid gasket.  When I reinstall the gasket it looked like this.  The gasket has 4 corners so it wasn't just me stretching it.  There's just too much gasket on the far side.


I decided to replace the existing gasket with a home made gasket.  I cleaned the gasket channel then masked both sides with 1/4" masking tape. 


A tube of high temperature Permatex silicone gasket material was applied then smoothed over with a finger.


When the tape was removed it revealed a very nice form fit gasket.  Double click on the picture for a closer look.  This material takes 24 hours to fully cure so it will sit on the bench until tomorrow.

I am heading back to clean the wheel wells.  It's a crappy job and Ty's not here to do it.  Stay tuned, more to follow.

Saturday, October 16, 2010

327 - The Engine Started - We are Safe at First Base!

Since the last posting Ty and I have re-looked at everything associated with the fuel.  We identified 3 items that we felt needed to be corrected.  The first item was the spill plunger.  As you recall we had to make a valve for the spill plunger that came with our 327.  That valve is shown in the spill plunger on the left.  Since then I was able to find an original NOS spill plunger, the one on the right.  Our valve does have a little more mass than the original so we decided to swap them out.  


The second item was the "filter support" as shown in the picture below.  This item was never installed in our unit.  The filter support keeps the spill plunger up tight inside the fuel bowl and it's a critical part.  Without it the spill plunger drops down and away from all the valving mechanism which means the fuel just recirculates. There are several different variations of this support and they range from rings to springs.  We decided to use the o-ring as shown.  It was a perfect fit.


 The third item we examined was the Cranking Signal Valve.  It's circled on the lower left of this picture.  This is a small check valve that has a long history of not working well and it's essential for starting the motor when cold.  If this valve fails closed the engine won't start.  Period.  I removed the valve and found the diaphragm couldn't hold a vacuum.


I tore it down and found the 5 components as shown.  I cleaned them up and reinstalled them using silicone along the edges.  It works better but needs to be replaced. 


Having tried to start the engine previously with little success I wasn't optimistic about it starting today.  In fact, I forgot to ask Gerri to film the event.  We cranked it over and it started.  Woo hoo!  We let it run for only 20 seconds or so, but it ran!  Gerri came running out with the camera and got the last few seconds and this short video captures our jubilation.  The motor needs to be tuned but that won't happen until after the radiator support is installed, the radiator is refurbished, correct hoses are purchased, etc. etc.


Our focus is now leaning more toward the body.  We modified the body dolly today to make access to the underside easier.  This winter we will remove the old undercoating, make fiberglass repairs and install bonding agent where needed.  We will work on the wheel wells first followed by the transmission tunnel, engine compartment, interior, then the exterior last.  That's plenty of work to get us through the winter.
Thanks for watching.

Sunday, October 10, 2010

327 - Gentlemen, Start Your Engine - Strike 2

Dennis K., Max H. and Ty came over today to help with the second attempt to start our 327.  We started the day very optimistic but we were soon disappointed.  We believe we still have a fuel problem.


We looked at everything that had anything to do with fuel.  In this short video Max is simulating manifold vacuum to push gas through the injectors, Ty is running the starter and coil wire, I am running a drill motor to turn the high pressure fuel pump, and Dennis is spraying starting fluid and running the throttle.  It was pretty comical and we did laugh about it, but the engine did run for a few seconds.  We all agreed it was lack of fuel. 


We examined the fuel line from the primary fuel pump up to the fuel injection unit and it was dry.  Max and Dennis removed the fuel lines and the primary fuel pump for further inspection.  The pump was bench tested and it worked fine.  Something else was wrong.


The culprit was a bent fuel pump push rod.  You can see the bend when it's put against a straight edge.   The push rod was wedged in the block which means it wasn't functioning.  Fortunately Dennis had a spare one and now the pump works perfect.  We tried a couple more attempts to start the motor  but now we have too much fuel.  We decided to give the battery and the starter a rest and try it again in a few days. 


Ty and I spent the rest of the day installing the drive shaft and shift linkage.  When we were finished we looked for something else to do and there was nothing.  The rolling chassis is done!  We couldn't believe it.


The next post will be an update on the fuel injection unit.  I was able to find a new spill plunger and it should arrive in a few days.  I'll replace the one we repaired last week and take another look at all the vacuum connections and diaphragms.  Ty took several of my fuel injection books home with him so hopefully we can noodle our way to a running motor.  Stay tuned for more.  Thanks for watching.

Thursday, October 7, 2010

327 - Fuel Issue - Solved!

After our first attempt to start our 327 failed, I went hunting for the problem.  I removed the fuel meter from the FI assembly then removed the spill plunger.  The loose pieces you see make up the spill plunger.  As you recall, the spill plunger regulates fuel flow by diverting recirculating gas to the fuel injectors.


This is a diagram of the spill plunger.  It's a very simple unit with only two moving parts.  The top two.


This is a picture of our spill plunger sitting adjacent to the pieces on the diagram.  Look close and you'll see that we are missing the critical piece that actually diverts the fuel.  The valve face is the second piece from the top.


Since I can't go to Napa and buy this piece I decided to make one.  The one I am holding was reduced in size a little bit more before it was installed.


Here it is installed in the spill plunger body.


The following is a 2 minute video of the spill plunger bench test.  If you have a slow connection you may want to pass on the download.

It was a streaming success!!

Sunday, October 3, 2010

327 - Oil Galley Leak - Fixed!

I searched the Internet for Stag sealant but I think it's a produce unique outside the US.  I visited a couple machine shops and both recommended Permatex High Performance Thread Sealant.  This is Teflon tape in liquid form.  The oil galley plug is a pipe plug and the threads are unique for pipe.  They're not coarse or fine thread, they are pipe thread.  Pipe taps are also different from standard taps because they are tapered.  The threads were cleaned with the tap, thread sealant was applied to a new plug, then we waited 24 hours before we tested it.  Success!


After we verified the leak was fixed we started the reassembly process.  The block face was cleaned then the head gasket was positioned and set dry.


The head was also cleaned and prepared for installation.


Because the push rods and rocker arms were not removed from the head, it was decided to apply torque in stages so as not to damage the push rods.  Tool tight was followed by 25, 50, then the full 65 foot pounds of torque.


Before installing the intake plenum, high temperature blue silicone was used around all the water ports.  This is insurance beyond the standard intake gaskets.  In this picture you can see the blue silicone applied in two places on the right head.  The second intake gasket was installed immediately after this picture was taken.


The plenum was set then torqued to 35 foot pounds.


The fuel filter, distributor, coil, plug wires and hangers were all reinstalled.


It took a lot of work to fix this oil leak but we did get to see the internals of our 327.  All-in-all it wasn't that bad. 


Now it's time to focus on the fuel injection unit.